Showing posts with label Maintenance. Show all posts

Thursday, February 28, 2008

Gas Gas Maintenance - 3

Following my DNF at the Snow Run Enduro, I removed the subframe from my '03 Gas Gas. It had broken in two places. One place looked like it had been broken for some time and the other break was fresh. Additionally I found two more cracks in the subframe. Three of the four fractures were in the heat-affected zone near a weld. After consulting with an experienced aluminum welder, I decided it was not feasible to repair the broken subframe.

These three pieces were once a complete subframe.

Unfortunately a new, aftermarket, subframe is $220. As you probably know by now, I'm cheap. So I hit up the internet looking for a used subframe. After a couple days I came across a couple leads. One was for an '03 aluminum subframe, for $125 + shipping. The other was for a '97 steel subframe for $50 + shipping. Have I ever mentioned that I'm 1/4 Scottish? Well If I haven't, and you know how tight a Scotsman can be with money, it doesn't take a genius to figure out which subframe I bought. Although heavier, steel is stronger than aluminum. However, I knew it would not be an exact fit as there were quite a few changes between the '97 and '03 models.
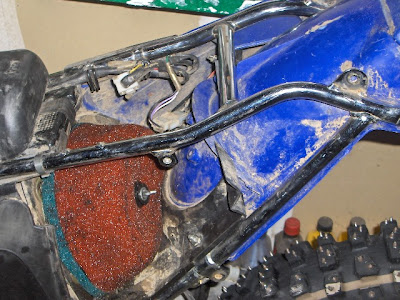

Here is the '97 subframe with most of the parts bolted back up. Excuse the dirt as I didn't do a great job cleaning up after the Snow Run Enduro.

The first problem was bolting up the seat. The mounts on the back of the seat base would not line up with the holes in the subframe. I knew somewhere there was a change made as the seat from my '01 Gas Gas would not fit on the '03 either.
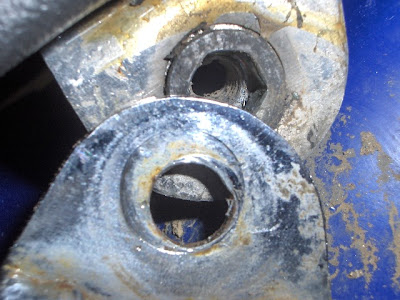

This was as close as I could get the '03 seat to align with the mounting holes in the subframe.

Luckily I had a spare seat from my '01 Gas Gas still laying around (actually it was at a friends house). A quick test fit showed it would bolt up. However the '01 seat did not have the tall seat foam that I need.


The spare seat from my '01 Gas Gas lines up almost perfect with the subframe holes.

Looking at the seat mounting tabs, it is obvious why the '03 seat does not line up. They are different. Since the '03 seat has the tall foam, needed for anyone over 6-feet tall, I decided to drill out the rivets and swap the '01 tabs onto the '03 seat.


With the '03 seat on the left and the '01 seat on the right, you can see the difference in the mounting tabs.

It took about 15-minutes to swap the mounting tabs over. Now the seat fits perfectly. The next project to tackle is the silencer.

Sunday, October 7, 2007

Gas Gas Maintenance - 2

There's nothing like a component failure to make one get off their butt and do some long overdue preventive maintenance. Such had been the case when my 2003 Gas Gas EC300 died at the Rocktoberfast Enduro.


New Wiseco forged piston, wrist pin and bearing installed on the connecting rod.


Once the piston was installed all I had to do was slip the jug (cylinder) over the piston. Even though it was stamped "A", the Nikasil plated cylinder does not require honing, but was worn enough, ~0.0005" to fit a "B" piston. Prior to installation I cleaned the cylinder and exhaust power valve assembly.


Here you can see the engine is all back together. All that's left is to install the expansion chamber, silencer, gas tank, seat and side panel.
But first...


I pulled the carburetor and reed block. Then installed new Boyesen Power Reed valves in the block.
And then...


I pulled apart the silencer and cleaned about 10 lbs. of carbon out of the screen, spark arrestor and end cap before repacking it. Note the budget packing. High temperature fiberglass insulation courtesy of Lowes. Sure you can buy fancy motorcycle silencer packing for $20, or spend $5 and repack your silencer 5 times. Hmmmm tough decision. Remember I'm a member of the Budget Racing Team.

Wednesday, October 3, 2007

Gas Gas Maintenance - 1


Piston from my 2003 Gas Gas EC300. Some carbon dragging, from the power valve, on the exhaust side of the skirt.

Buying a used bike is always a gamble unless you know the previous owner. Even then you might know them, chances are good you'll find a hidden surprise or two. The previous owner of my 2003 Gas Gas EC300 was one Doug S., whom I've known for a few years. In fact Doug was the original owner of my 2001 Gas Gas XC300 (I'm the third owner of that bike). I'd been warned that Doug's mechanical skills are on par with those of an 8th grader who sniffed too much gasket remover in shop class. While I have yet to confirm this warning, I will say that Doug never did any mechanical work to the engine in the four years he owned the '03 Gasser.

I should have listened to my inner voice when it told me to do a top-end. Actually I should've listened to a lot of things my inner voice was telling me. However, with limited time to perform preventive maintenance I ignored my inner voice. The result of this misfortune can be seen in these pictures.


Here you can see the main culprit. The compression rings are stuck in the ring grooves on the exhaust side of the piston.

I'm not going to make any excuses or blame the previous owner or the bike. This failure, and my subsequent DNF at the Rocktoberfast Enduro, was the result of my laziness. Prior to the Newark Enduro I should've changed the main jet from a 175 to a 178. While the 175 was fine for short full-throttle bursts, running WFO in top-gear through open fields and back roads was a big NO-NO. When the air filter became clogged with dust, this actually prevented air flow into the engine. Less air meant the engine ran hotter. The combination of all three caused the rings to stick in the grooves.

This week I'l be putting in a new piston, cleaning the exhaust power valve, installing new reed valves on the intake and repacking the silencer. In case you're thinking I'm forgetting something, I already installed a 178 main jet in the carburetor.

Wednesday, September 12, 2007

Bultaco Maintenance - 1


1973 Bultaco Model 98 "Sherpina"

After my friend (Sponge) Bob suffered a DNF at the CATRA Vintage Trial, due to a faulty condenser, I decided it's time to move my condenser up to the frame. I should've done this back when I rebuilt the bike. Luckily my bike never suffered the same problem as (Sponge) Bob's borrowed Bultaco. The job wasn't that difficult and took less than an hour to complete.


The photo above shows the new location of the condenser, attached to the frame.

Tools Required: 13mm socket, 3/8" drive ratchet, 13mm wrench, T-handle allen key, 27mm impact socket, 1/2" impact driver, flywheel puller (and wrenches), flat-blade screwdriver, Phillips screwdriver, 10mm wrench, center punch, ball-peen hammer, 3/8" drill, 1/8" drill bit, wire stripper/crimper, 8mm wrench.


Here you can see the Radio Shack electrical junction block installed in place of the stock junction block. I replaced this in 2004 when I restored my Bultaco. The stock junction block was badly corroded and some of the screws were stripped. While I do not like using butt-splice connections, this bike does not see much regular use. The yellow wire is attached to the lighting coil, in case I ever want to add lights.

Additional Parts Required: Butt-splice wire connector, screw and a nylock nut.

Process: Remove kick-start lever, ignition cover and ignition/lighting coil (hint: if your ignition timing is spot-on, punch mark the backing plate and side case to use as timing marks). Disconnect the condenser wire from the points and remove the condenser from the backing plate. Reinstall the ignition/lighting coil and slip the flywheel onto the shaft. Remove the tank and find a spot on the frame, near the coil, to install the condenser. Mark the spot, center punch and drill a 1/8" hole through the frame. Rub the paint to expose the bare metal where the condenser contacts the frame. Attach the condenser with the screw and nylock nut. I like to use nylock nuts because they have less chance of vibrating loose. The stock junction block accepted bare wire ends, which would only require removing the connector and stripping 1/4" of insulation from the wire. The Radio Shack junction block uses screws which are too large for the connector on the condenser. I removed the connector, stripped back 1/4" of insulation and installed a new butt-splice wire connector. Then I wired the condenser into the primary side of the ignition coil.


Above is the complete ignition system showing the junction block, relocated condenser and ignition coil.

After relocating the condenser I checked ignition timing and point gap. Sherpa T timing is supposed to be 2.5mm to 2.7mm BTDC. I don't remember what the Alpina timing is, but it is different. The point gap was within specification, but timing was around 3.5mm, so I retarded the timing to 2.7mm. Additionally I changed the sparkplug from an Autolite 64 to an Autolite 65. This is a one-step hotter plug which, hopefully, will prevent the plug fouling I experienced at the CATRA Vintage Trial. Finally I put everything back together... well, almost. It was time to clean and re-oil the air filter. Also noticed the rear brake was hanging up, so I'll need to pull the rear wheel and take a look at that.

Sept. 17, 2007 - Update: Over the weekend I cleaned and re-oiled the air filter. Also took the rear wheel off and fixed the back brake using a small amount of Lubriplate the grease the brake shoe cam. I was concerned that I might have difficulty starting the Bultaco after making multiple changes (condenser move, ignition timing and spark plug heat range) to the ignition system. To my surprise, after tickling the carburetor and giving two slow-speed priming kicks, it fired up on the first full kick. After adjusting the carburetor air screw and idle speed I warmed up the engine then took it for a few laps around my backyard practice trap. As I suspected the power is a bit sluggish compared to when the timing was set at 3.5mm. However the engine tends to rev out further and idles along nicely at crawling speed. First gear works really well in my practice trap. Before the motor would top out climbing the hills in first gear. I'm still thinking about installing a one-tooth smaller countershaft sprocket, but I really should ride it in a trial before making any more changes. Also considering replacing the primary and secondary silencers with a motocross silencer I have for my GasGas enduro bike. The Bultaco is not horribly loud, but I'd like to see if I can make this silencer work. It's aluminum and would reduce overall weight by replacing two heavy steel silencers. Additionally I could repack this silencer making the Bultaco, hopefully, quieter. Screw it! I don't have the time to do a one-off custom fabrication. I'll just braze up the hole in my primary (middle) silencer and use radiator hose over the joint between the header pipe and primary silencer.